| Bob Willis vs Australia, Headingly 1981 | Attack Rating: 80.6 |
|
SUMMARY:
In any other game Bob Willis’s extraordinary second innings spell against the Australians at Headingly in 1981 would be the stuff of legend. However just as often it lies in the shadow of Ian Botham’s feats a day earlier. In this most famous of test matches Willis bowling figures of 15.1 Overs, 3 Maidens, 43-8 we’re the perfect riposte to Botham’s match saving 145n.o. Even more remarkable was the fact that Willis had gone wicketless in the first innings and there were press murmurings about his place in the side. There is no doubt that on this particular day Willis would have picked up wickets regardless of the field setting: In an inspired spell of fast bowling he made the most of a wicket that had been unpredictable all match. The bowling was controlled but vicious with nearly every ball demanding something of the batsman. Yet even as Australia collapsed from 1/50 to 8/110 Australia could still have fallen across the line with a few singles and a streaky boundary. Captain Mike Brearley had started the day with only 121 runs to defend and as the innings progressed it was his subtle changes to the field that both risked runs and drew wickets and was a small, but very real contribution to a victory against all odds.
BOWLING TO THIS FIELD: In normal circumstances the primary purpose of this field is to draw an edge to the keeper/slip-cordon. It can be effective because the large gaps in the off side & the away swing often prove too tempting for batsman to resist committing to an aggressive shot. The bowler is aided by the extra bounce of the new ball & speed off the pitch making late shot adjustments difficult. The batsman may go through with the aggressive shot or at the last moment decide to leave the ball or attempt to defend instead.. The lack of defence, especially on the leg side means no bowler should attempt this unless they have excellent control of line & length. And this is exactly what Willis achieved on that day in Headingly... Willis's ability to keep to a consisent out-side-Off stump line gave Brearley just enough flexibility to keep fielders in catching positions, and defend runs on the off-side. Had Willis failed to do this there were easy leg side runs and the entire strategy would have fallen to pieces. Apart from his sheer pace and bounce a major key to Willis’s sucess was his going wide on the bowling crease to deliver balls that were pitching outside off stump but angling into the stumps. This angle gave batsmen no choice but to commit to play at shots pitching outside off stump. It is no coincidence then that 7 of Willis’s 8 wickets were from catches and 5 of those were behind the wicket on the off-side.
The Stock Ball to this Field:
Bowling Variations/Wicket Balls:
Avoid:
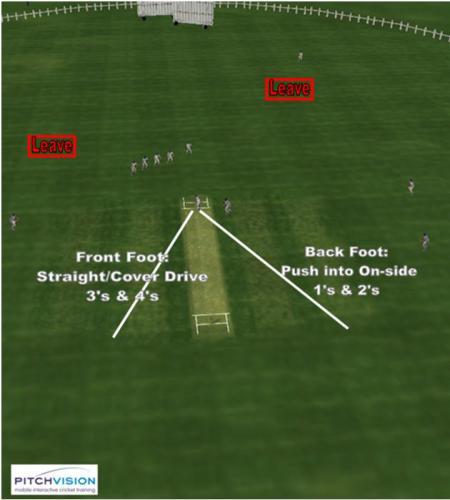
BATTING AGAINST THIS FIELD: It’s hard to bat against any bowler who is having an ‘inspired’ spell, particularly on a unpredictable wicket. However by just looking at the way the Australians got out provides an indicator as to what they could have done better. In hindsight, they could have defeated the rampaging bowler by dropping the shots that were playing into Willis's hands, and concentrated on defeating the Captain’s field. However, even after 3-4 wickets had fallen in similar manner none of the Australians seemed willing to adjust their play to the situation. Batting at 7, Rod Marsh's dismissal attempting an aggresive cut shot is a particularly good example Australian Captain, Kim Hughes made an interesting observation after the match. He said he believed Willis had bowled just as well in the first innings (where he went wicketless!) as he had in the second (8/43). He felt that the difference was that in the first innings Australian Batsman played and missed often: the run of luck was with them and they did not take edges. In the second innings the run of luck ran with England and the edges came: Both cases still proved the same thing, ie the Australian batsman prodded at too many balls outside off stump. They got away with it in the first innings; it brought them undone in the second. So, Lesson #1: Leave balls that are short outside off stump. They are going to bounce over the wicket and judging the angle and extent of bounce will draw edges. Show the bowler that you have absolutely no interest in balls in that corridor and make the bowler bowl to you. Play conservatively within the ‘V’, use the angle of the delivery to push into mid-on off front and back foot and take singles. Lesson #2: See the ‘inspired’ bowler off. Get your runs from the other end.
VARIATIONS:
WHERE SEEN USED:
REFEREMCES:
|

|


